
This post contains affiliate links. If you purchase through my links, I may earn a small commission at no extra cost to you. See my Affiliate Disclosure for details.
If you have ever spent a late night browsing Teachers Pay Teachers, carefully downloading the perfect phonics worksheet, printing it on nice cardstock, and then watching your child blast through it in permanent marker in under ninety seconds, this post is for you.
Dry erase pockets changed the game for us. The concept is simple: you slide a printed worksheet into a clear plastic sleeve, hand your kid a dry erase marker, and they write directly on the pocket. When they are done, you wipe it clean and the original printable underneath is untouched. Ready to go again tomorrow, next week, or in the car on a long drive.
That is it. That is the whole hack. But the amount of money, paper, and ink it has saved us is genuinely ridiculous.
The Setup (Under $25 for Everything)
You only need three things to get started, and none of them need to be fancy.
1. Dry Erase Pocket Sleeves
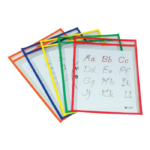
Mr. Pen Dry Erase Pocket Sleeves (6-pack) are the ones I recommend. You do not need 30 of these. The whole point is they are reusable, so a 6-pack is plenty. Swap out the worksheet inside whenever you want a new activity.
The reason I like these specifically is that they have pen holders built right into the sleeve. I cannot stress enough how much this matters. The universe will never bless you with an easy-to-locate dry erase marker. Having a holder attached to the pocket means the marker stays with the activity, which means you might actually use it more than once before losing the pen into the couch cushion dimension.
2. Dry Erase Markers
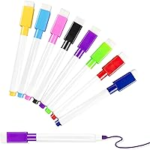
JEFURE Dry Erase Markers (25-pack) are the way to go here. Do not overthink this. Get the cheap ones in bulk. They will dry out. You will rebuy. That is just how dry erase markers work, and accepting this will bring you peace. These come in a bunch of colors, which kids love, and they have eraser caps, which is a nice bonus.
3. Whiteboard Cleaner Spray and Cloth
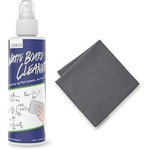
You do not need an actual dry erase board eraser. A microfiber cloth and whiteboard cleaner spray will do just fine. This loukin spray is non-toxic and comes with a cloth included. You will mostly just wipe the pockets clean with the dry cloth, but the spray is there for when you start seeing ghosting (that faint shadow left behind after erasing).
Hot tip: If a smudge will not come out no matter how hard you wipe, write over it in fresh marker, then immediately wipe it off. Nine times out of ten, that will do the trick. The fresh ink reactivates the dried stuff underneath.
Why This Is Perfect for TPT Printables
If you are anything like me, you have a growing collection of TPT downloads saved on your computer. Phonics practice sheets, sight word activities, math fact drills, handwriting pages. The problem is that most of these are designed to be used once. Your kid fills it in, and then you need to print it again if you want to repeat it.
With dry erase pockets, every printable becomes infinitely reusable. Print it once on regular paper or cardstock, slide it into a pocket, and you are set. This is especially valuable for skills that need repetition, like letter formation, phonics blending, CVC words, or math facts. The kind of thing where doing it once is not enough and doing it ten times on ten separate printed sheets feels wasteful.
Teachers have been doing this in classrooms for years. Amy Lemons and other teacher bloggers have shared tons of creative ways to use these in math centers and literacy stations. The same ideas work just as well at your kitchen table.
6 Ways to Use Dry Erase Pockets Beyond Worksheets
Once you have a few of these lying around, you will start finding uses for them everywhere. Here are some of the best ideas I have found from teachers, homeschool parents, and our own trial and error.
1. Car Practice Kits
This is the one that changed our routine the most. Load up a pocket with a sight word sheet or a phonics activity and toss it in the car with a marker. Drive time becomes practice time. No mess, no loose papers flying around, and the pen holder means everything stays together. This works great for long drives but honestly even the fifteen-minute ride to therapy is enough time to get a few rounds in.
2. Letter and Number Tracing
Print a tracing sheet, slide it in, and let your kid trace the letters or numbers directly on the pocket. Wipe and repeat. This is especially good for kids who are still developing fine motor skills because the slick surface of the pocket gives a slightly different (and easier) writing feel than paper.
3. Math Fact Practice
Print a blank addition or multiplication grid and slip it in. Your child fills in the answers, you check together, wipe, and do it again. Teachers use this one constantly in classroom math centers for a reason. It works.
4. Reusable Chore Charts and Checklists
Print a daily checklist or chore chart and put it in a pocket. Your child checks off tasks with a dry erase marker throughout the day. At the end of the day, wipe it clean and it is ready for tomorrow. Stick it on the fridge with a magnet and you have got a system that costs almost nothing to maintain.
5. Drawing Prompts and Free Draw
Slide in a sheet with a drawing prompt or even a half-finished picture and let your kid complete it. You can also just use a blank sheet of paper inside for free drawing on a surface that wipes clean. Great for restaurants and waiting rooms.
6. Game Boards
Print a tic-tac-toe grid, a connect four board, or a simple game board and slip it in. Instant reusable game. This is another fantastic car activity because there are no loose pieces to drop between the seats.
Keeping Them in Good Shape
A few quick maintenance notes that will save you frustration down the road.
Erase sooner rather than later. The longer marker sits on the pocket, the more likely it is to ghost. If your kid finishes an activity, wipe it down that day rather than letting it sit for a week.
Replace markers regularly. Old, dried-out markers actually cause more ghosting than fresh ones. When a marker starts looking streaky or faded, toss it. This is why buying cheap ones in bulk is the way to go.
Use the spray for stubborn spots. For everyday erasing, the dry cloth is fine. Save the spray for when you see ghosting that will not come off with wiping alone.
And remember: fresh marker over old smudge, then wipe. That trick alone will handle most of the stubborn spots you run into.
The Quick Shopping List
Here is everything you need to get started. Total cost is under $25 and it will last you a long time.
✅ Mr. Pen Dry Erase Pocket Sleeves (6-pack) — the ones with built-in pen holders
✅ JEFURE Dry Erase Markers (25-pack) — cheap, colorful, bulk
✅ loukin Whiteboard Cleaner with Microfiber Cloth — for ghosting and deep cleaning
Looking for more tools that actually make home practice easier? Check out My Favorite Homeschool Tools for everything I use and recommend.
About Decoding Mom
Decoding Mom is written by a mom of a bright kid with ADHD and mild dyslexia. After too many late-night research binges trying to make phonics fun, she started this site to translate the science of reading, IEPs, and special-ed assessments for parents figuring it out the hard way. Honest, parent-first, no fluff. More about her here →
Leave a Reply